If your casserole comes out burnt on one side and raw on the other, or your baked goods never brown properly, your oven has an uneven heating problem. The good news: most causes are diagnosable at home and many are cheap to fix. Here are 9 technician-tested solutions — starting with the simplest.
Why Even Heating Matters (and What Goes Wrong)
A properly functioning oven maintains a consistent temperature throughout the cavity. When something disrupts that balance — a faulty element, a broken sensor, or even poor rack placement — hot and cold zones form. Understanding the root cause is the key to fixing it for good.
Fix 1: Calibrate Your Oven Temperature
Most modern refrigerators use an inline water filter to clean the water going to both the dispenser and the ice maker. Over time, these filters get clogged with sediment and mineral buildup — and a clogged filter restricts water flow enough to stop ice production entirely.
The fix: Check when you last replaced your water filter. The general recommendation is every 6 months. If it’s been longer than that, replace it. Filters are model-specific, so check your refrigerator’s manual or look up your model number online to find the correct replacement. After installing the new filter, run a few gallons of water through the dispenser to flush the system before expecting ice.
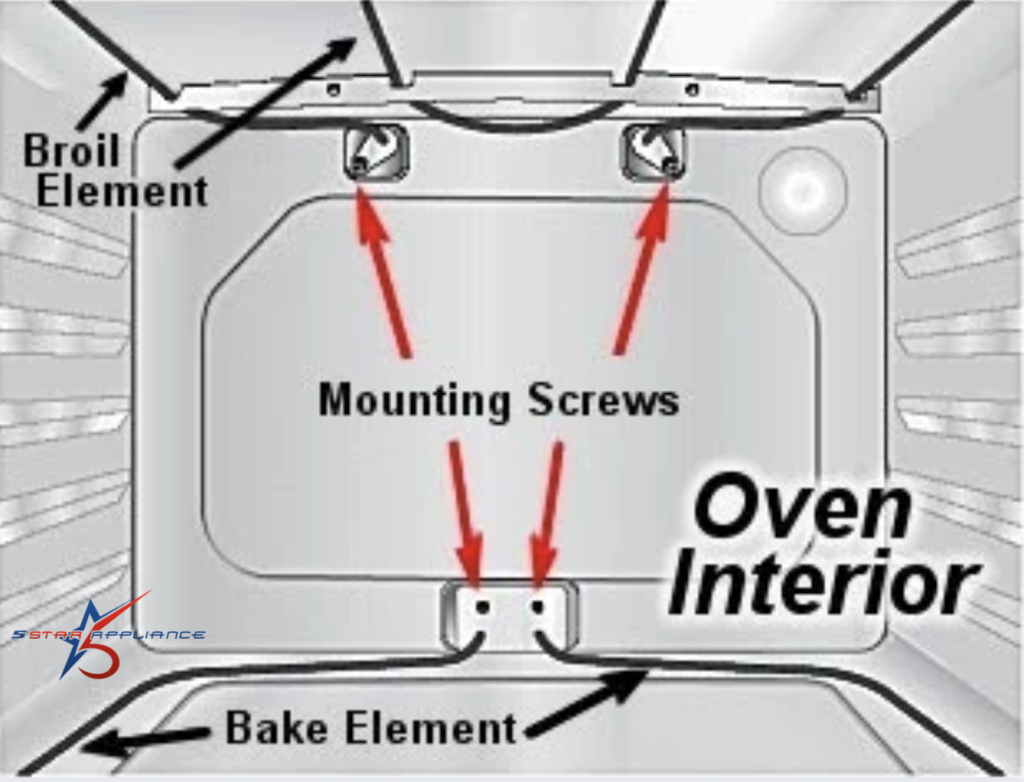
Fix 2: Check the Bake Element (Bottom Element)
The bake element does about 85% of the heating work in an electric oven. If it’s damaged, you’ll get severe bottom-heavy cold spots.
Signs of failure: Visible cracks, blistering, or dark spots on the element. It may also fail internally with no visible signs.
How to test it: With the oven cold and unplugged, inspect the element visually. You can also use a multimeter to test for continuity — a failed element reads as an open circuit (no continuity).
Replacement cost: Bake elements typically cost £15–£50 and are a straightforward DIY replacement on most models.
Fix 3: Inspect the Broil Element (Top Element)
Even if you’re not using the broil function, the top element cycles on during baking to maintain even heat from above. A failed broil element creates a cold top zone.
Test it the same way: Visual inspection for damage and a continuity test with a multimeter.
Fix 4: Replace a Faulty Oven Temperature Sensor
The temperature sensor (also called the RTD probe) tells your oven’s control board what the internal temperature is. A faulty sensor causes the oven to over- or under-heat in unpredictable ways.
Where to find it: Usually a thin metal probe mounted at the back upper-left of the oven cavity.
How to test it: At room temperature (21°C/70°F), the sensor should read approximately 1080–1090 ohms with a multimeter. A reading far outside this range means the sensor is bad.
Replacement cost: £10–£40, and it usually involves only two screws and a wire connector.
Fix 5: Check the Oven Door Seal (Gasket)
A worn or damaged door gasket lets heat escape, causing temperature drops and uneven zones near the door.
How to check it: Run your hand slowly around the door edge while the oven is on — you should feel little to no heat escaping. Also inspect the rubber or fibreglass gasket for tears, hardening, or gaps.
Fix: Door gaskets are model-specific but inexpensive (£10–£30) and usually clip or screw into place without tools.
Fix 6: Allow Proper Preheat Time
Many uneven heating complaints come down to impatience. When your oven beeps that it’s “ready,” the air may be at temperature — but the oven walls, racks, and base still need time to absorb heat.
Best practice: After the preheat signal, wait an additional 10–15 minutes before putting food in. This is especially important for bread, pizza, and pastries.
Fix 7: Adjust Rack Position and Avoid Overcrowding
Hot air needs to circulate freely. Placing too many trays in the oven, or positioning food too close to an element, creates hot and cold zones.
Rules of thumb: For single-tray baking, use the centre rack. Leave at least 2–3 inches between trays and oven walls. Avoid lining the bottom of the oven with foil — it blocks heat circulation dramatically.
Fix 8: Run the Self-Clean Cycle (Carefully)
Over time, grease and food residue build up on the oven floor, elements, and walls. This residue absorbs heat unevenly and insulates certain areas, creating hot spots.
What to do: Run a self-clean cycle every 3–6 months. If your oven doesn’t have self-clean, wipe down the interior with an appropriate oven cleaner after it cools.
Caution: Remove all racks before self-cleaning — the extreme heat can warp them.
Fix 9: Test or Replace the Control Board
If you’ve checked all of the above and the problem persists, the issue may lie with the electronic control board, which governs how the elements cycle on and off. A failing board can cause erratic heating patterns.
Signs it’s the board: Elements test fine but the oven still heats inconsistently, temperature swings wildly, or error codes appear on the display.
Recommendation: Control board diagnosis is best left to a qualified appliance technician. The part itself (£50–£200+) is expensive enough that a professional diagnosis is worthwhile before purchasing.
When to Call a Technician
If fixes 1–8 don’t resolve the problem, or if you’re not comfortable working with electrical components, call a qualified appliance repair technician. Uneven heating that’s left unaddressed doesn’t just ruin meals — it can mask a more serious electrical issue that worsens over time.